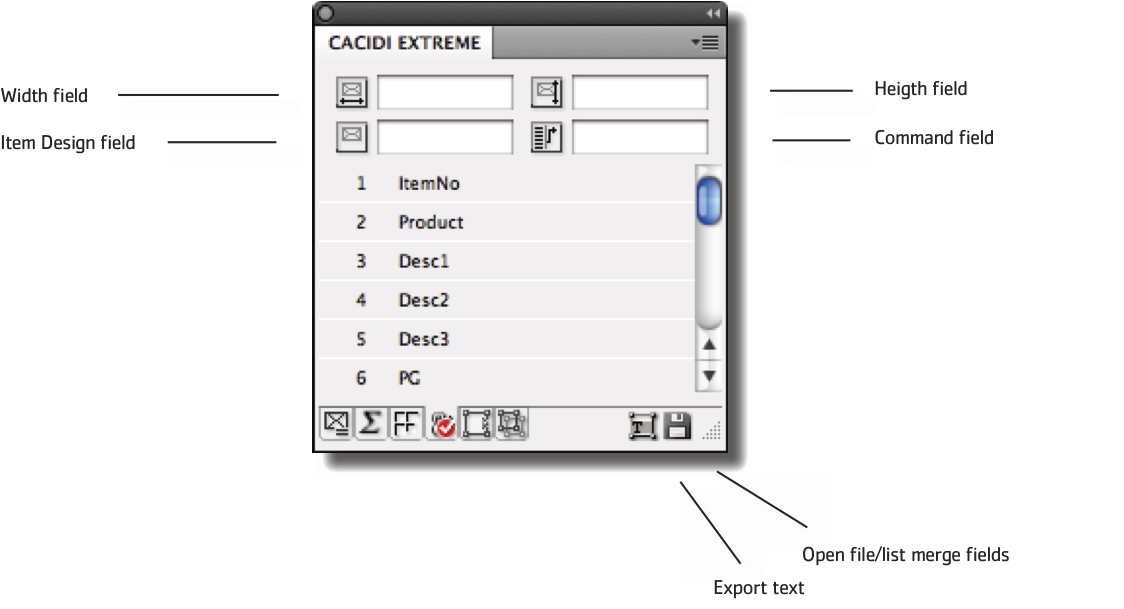
The Text Link Panel
From the Text Link panel you will have access to any data field available from the current data source as defined within the Project Settings. Here, you can also provide the information on which data fields should be used as one of the 4 special fields used by any AutoCalc production to allocate the correct Item Design and placement for the current entry in the data source.
Module height
Your Data Source needs a field in where to specify how much space your Module is allowed to allocate in terms of height (tiles). This number is not inches or centimetres, but allocated in tiles.
For the two Position Placement calculations, this field is used to declare the Modules vertical position. Use a + sign to add additional height ([Height]+1).
Module width
Your Data Source needs a field in where to specify how much space your Module is allowed to allocate in terms of width (tiles). The Module width can only be adjusted when using Non-Breaking calculation methods.
For the two Position Placement calculations, this field is used to declare the Modules horizontal position. Use a + sign to add additional width ([Width]+1)
Module name
Your Data Source needs a field in where to specify the name of the Module needed for each data entry. This Module will always be used for all Non-Breaking calculation methods. For all Breaking calculation methods, only a part of the name will be used (the name onwards to the first -) while the rest of the Module name will come from the calculation.
Command field
In this field you can specify commands for AutoCalc. Each command applies to the data entry it's entered into.
For the two Position Placement calculations, this field is used to declare the page number on which the Module should be placed.
For all other calculations, you can specify five different kinds of commands:
NEXTC: skips the rest of the column and places the Module in the next column. Thus, the Module will be placed at the top of the next column.
NEXTP: skips the rest of the page and places the Module at the top of the next page.
BINDTONEXT: ties this Module to the next Module, which means AutoCalc will check whether the next Module will fit into the column or page. If there is not enough room for this Module as well as the next, both will be placed in the next available column.
SPREAD: places the Module on the next left most page in a document spread. Use this command only for Modules spanning a full spread and a full page height.
SPREADTOPAGE: places a Module on a left most page in a document spread. If there is no more room on the left page, the command will either jump to the next left handed page and place the Module on this page or create the next left handed page if it doesn't exist (thereby creating a possible right handed page as well if none exists). Use this command for Modules that span a full page spread but not necessarily a full page height for Predefined production methods. If using this command, make sure you are standing on a left-handed page before starting the calculation method.
For calculation methods that places snippets on a page, not inline in a text frame, two information can be set in the command field the command and the master page that will be applied to the page, the data must be separated using a colon like this [Command]:[Master].
Merge fields list
The Text Link panel also gives a list of all the data headings or Merge fields in the current Data Source for the selected project.
To insert a merge field, place the text marker in a text frame and click on any of the merge fields in the list. The merge field will be entered into the text frame surrounded by brackets ([ and ]) signifying this as a merge field.
In addition to the Merge fields found in the Project Data Source, Cacidi Extreme creates two additional data fields: LOOP and LINECOUNTER.
The LOOP data field contains grouped data if Data Grouping has been set up in the Projects settings and the LINECOUNTER data field contains the number of grouped data lines for each LOOP field.
Use the LINECOUNTER data field as information about Module height for Breaking calculations.
Show/Hide Text Merge Adornment
Clicking Show/Hide Text Merge Adornment-button in the Text Link panel allows you to easily see which text have been created dynamically through a Cacidi production and which text is statically entered. Click the button again to turn the effect off.
Export Data
After producing a document using one of the Cacidi Extreme AutoCalc methods, you can easily edit your data directly in the InDesign document.To export these changes to your Data Source, click the Export Text button in the Text Link panel.
NOTE: Not every production is supported for data exporting. Using a Custom Data Source or editing data in a grouped LOOP field will not export the changed data.

