The Admin Tool
The Cacidi Extreme Enterprise Server comes bundled with an Administrator Tool for setting up and maintaining various configurations for the Cacidi Extreme Enterprise Server software.
From within the Admin Tool all service folders described in the previous section can be defined and settings for output formats and file formats can be configured.
The tool has five panels that can be switched on by clicking the various tabs in the top of the window.
Additionally, the right-hand side of the tool gives control over the Cacidi Extreme Enterprise Server :
Start Server: Press this button to start the Cacidi Extreme Enterprise Server . This function will not start the Adobe InDesign Server , only the Cacidi Extreme Enterprise Server software. Note, that the InDesign Server application must be up and running before starting to Cacidi Extreme Enterprise Server.
Stop Server: Press this button to stop the server. Note, this process will not stop the Adobe InDesign Server application, only the Extreme Enterprise Server plug-ins.
Select Server-popup menu: Use this pop-up menu to create new or select existing configuration instances for the Extreme Enterprise Server. After creating a new or selecting another configuration, you must press Send Settings in order for the changes to take effect.
Send Settings: Click this button to send the current configuration to the Extreme Enterprise Server.
The Input tab
From the Input tab, settings for watched hot-folders as well as the mandatory service folders are defined.
Additional watched hot-folders can be added or deleted and priorities for each folder can be set allowing jobs placed in folders with higher priority to take precedence over jobs in lower prioritized watch folders.
Add button: Click this button to browse and select additional hot-folders to be watched.
Delete button: Click this button to delete the selected watch folder.
Priority: Enter an alpha-numeric value for setting the priority for the selected watch folder. A takes precedence over B and 1 takes precedence over 2. The highest prioritised folder needs to be empty before any waiting jobs in the lower prioritised folder are executed. A night priority queue can be defined by the entering N in the priority. Jobs in a night queue will only be executed when any higher ranked folder is empty and only in hours between midnight and 6.00 AM.
Template folder: Click the button to browse for the location of the TEMPLATE folder. Since the TEMPLATE folder is a mandatory folder, you should never point to the folder itself. Rather, point to the directory in which the TEMPLATE folder recides.
Item folder: Click the button to browse for the location of the GROUPS folder. There is no actual folder named Item in the Enterprise Server, rather by pointing to the directory where the GROUPS folder recides, the Cacidi Extreme Enterprise Server will delve into the correct client group to locate Item Designs needed when starting a production
Script folder: Click the button to browse for the SCRIPTS folder.
Word Styling File: Click this button to browse for a Word styling text file to be used with the server configuration
Status: This lists the current connection status with the Adobe InDesign Server .
The Preview tab
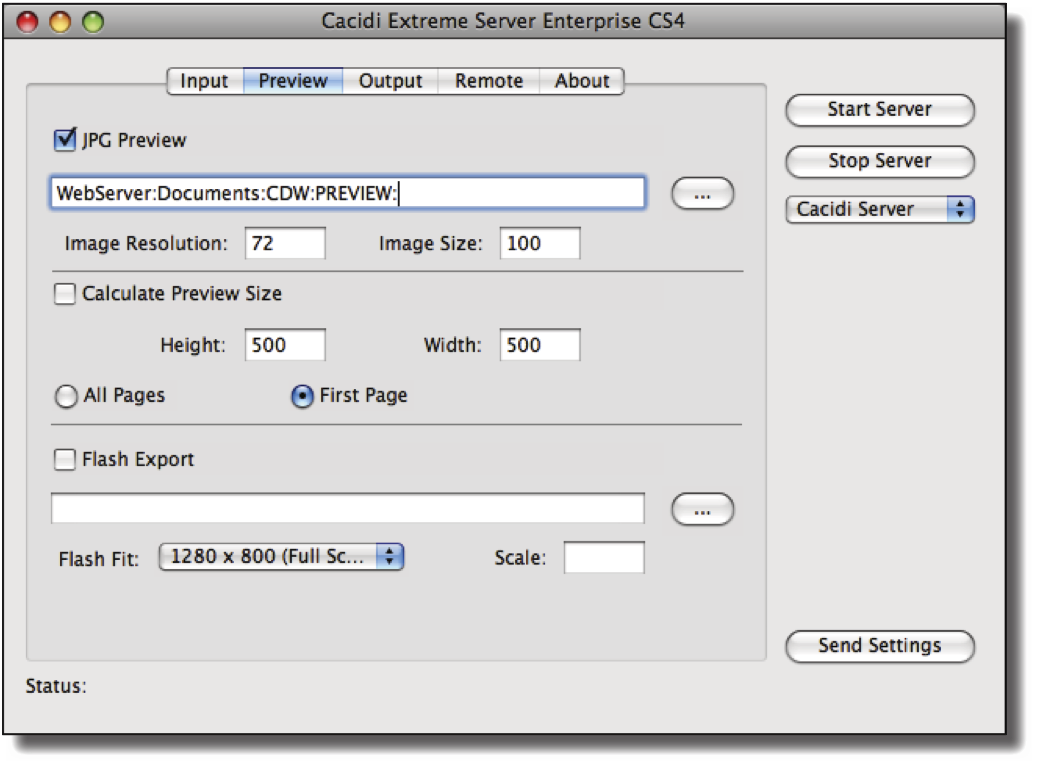
From the Preview tab, you can define which preview (JPG and/ord Flash) should be created and where they should be saved after the automated production. You are even able to define resolution, size and which pages to present (First or all) in the end users web-browser.
JPG Preview: Click this checkbox to have the server create JPG previews of produced jobs. Browse for the actual PREVIEW folder on the server to save the path into the current configuration
Image Resolution and Size: Image resolution is defined by dpi (dots per inches). Normally a setting of 72 dpi will be sufficient for a screen preview. Image Size defines the size percentage compared to the original InDesign template. This setting is overruled if Calculate Preview Size (see below) is checked.
Calculate Preview Size: This option defines maximum size in pixels an image can have. Checking this option overrules any Image Resolution and Size set in the option above.
All Pages / First Page: By selecting All Pages, all multipage productions will have individual JPG page previews in the webbrowser. Otherwise, only the first page will be presented as a preview.
Flash Export: Checking this box to export the production as a Flash file. Browse for the actual FLASH folder on the server to save the path into the current configuration.
Flash Fit and Scale: Select an option for the Flash resolution as defined in pixels from the popup menu and a scale for the Flash output.
The Output tab
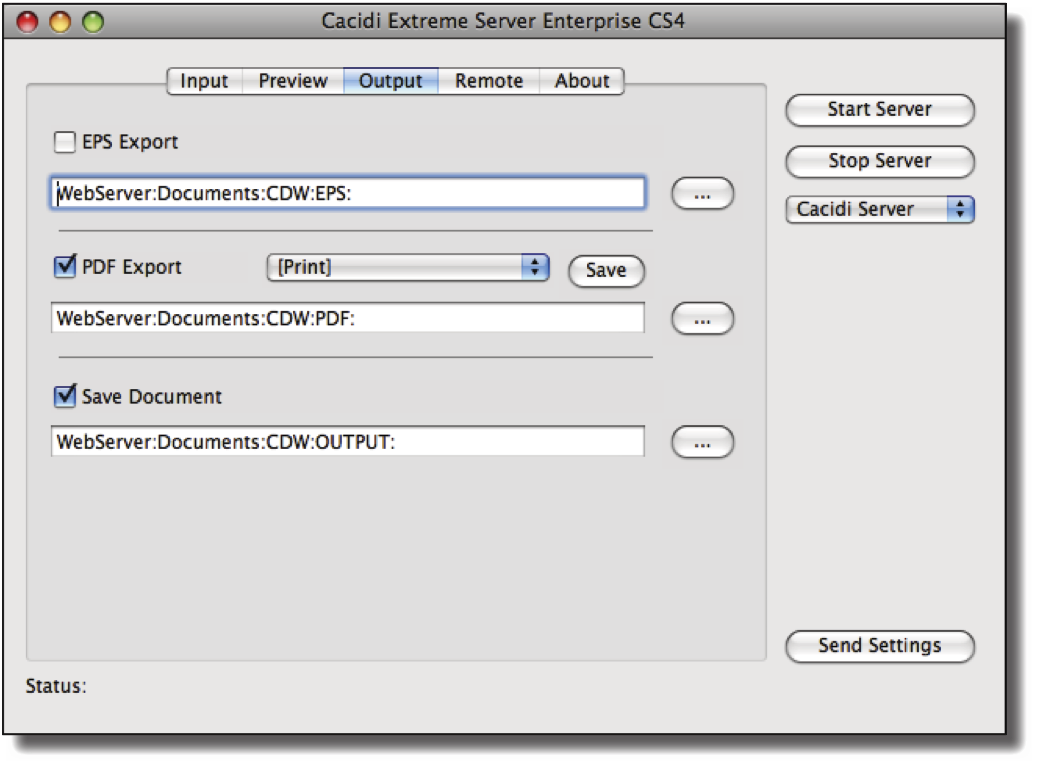
Choose whether EPS and PDF documents should be created from the production, where the exported files should be placed and where the general OUTPUT service folder is reciding from the Output tab.
EPS Export: Click this checkbox to export created jobs into the EPS Postscript format. Browse for the actual EPS folder on the server to save the path into the current configuration.
PDF Export: Click this checkbox to export created jobs into the PDF format. Browse for the actual PDF folder on the server to save the path into the current configuration.
PDF Presets: Choose the prefered PDF Preset available on the server that should be used when exporting finished jobs into PDF documents. See the Adobe InDesign Server documentation for information on how to create and install additional PDF Presets to the server.
Save Presets: Click the Save button will allow you to save the PDF presets from the pop-up menu into the SYSTEM folder of the Enterprise Server.
Save Document: Click this checkbox to save the actual Adobe InDesign .indd document that is created with the Adobe InDesing Server and Cacidi Extreme Enterprise Server . Also specify the actual OUTPUT folder on the system to save the path into the current configuration.
The Remote tab
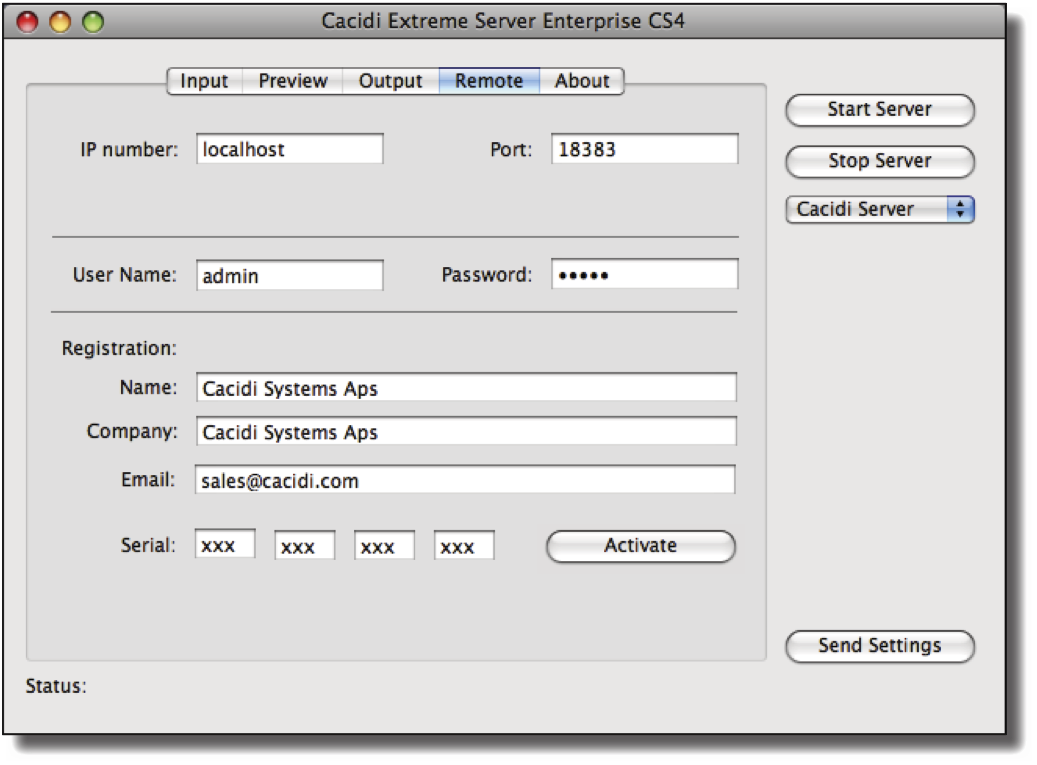
The Remote tab is the preference setting area for your servers IP- and portnumber. This area also lets you register and activate you server, and define admin login and password.
IP number: Enter the IP number or address for the server that has the Adobe InDesign Server application running. Entering localhost specifies that the InDesign Server is run locally on the same server where the Admin Tool is installed.
Port: Enter the communication port for the Adobe InDesign Server . By default, this is 18383.
User Name and Password: The username and password is sent to the server each time you start, stop or change its settings.
Registration: When the server is starting up, registration information is sent to Cacidi Systems' license server directory. Information about name, email adress, serial no, InDesign Server serial no. and hardware machine ID's (MAC address) are sent to Cacidi Systems. No other information is passed on.
When changing the physical location of the Cacidi Extreme Enterprise Server to another hardware server, you must contact Cacidi Systems for re-authorization in order for the server software to function.
For first time activation, please enter name, company, email and Cacidi Extreme Server serial no., and click ”Activate”. Your server must be able to access the internet in order to activate.
The About tab
This tab shows copyright and other relevant information about the Cacidi Extreme Enterprise Server system.
The Extreme Server menu
The Administrator Tool has an Extreme Server menu with the following options:
Quick Setup: Choosing this option will prompt you for a folder where the following 7 service folders will be created: EPS, FLASH, OUTPUT, PDF, PREVIEW, TEMPLATES and WATCH. Additionally, the folder paths for the just created folders will be automatically entered in the apropriate places in the Admin Tool.
Quick Setup Cacidi Workflow: Upon selecting this option you are prompted for a folder wherein the various service folders have already been created. All correct folder paths based on your selection will then be set in the various places in the Admin Tool.


