
When working with automation, which include images, you must deal with a number of questions. These questions could be a) how is the merge markers set or constructed for an image, full file path or?, b) how should the images be placed within the frame in terms of scaling and alignment, c) if the images does not exist what should we do? delete the frame or? In this tutorial we will try to cover these three issues. We will also discus default images, forces scaling, alignment by numbers and off set. 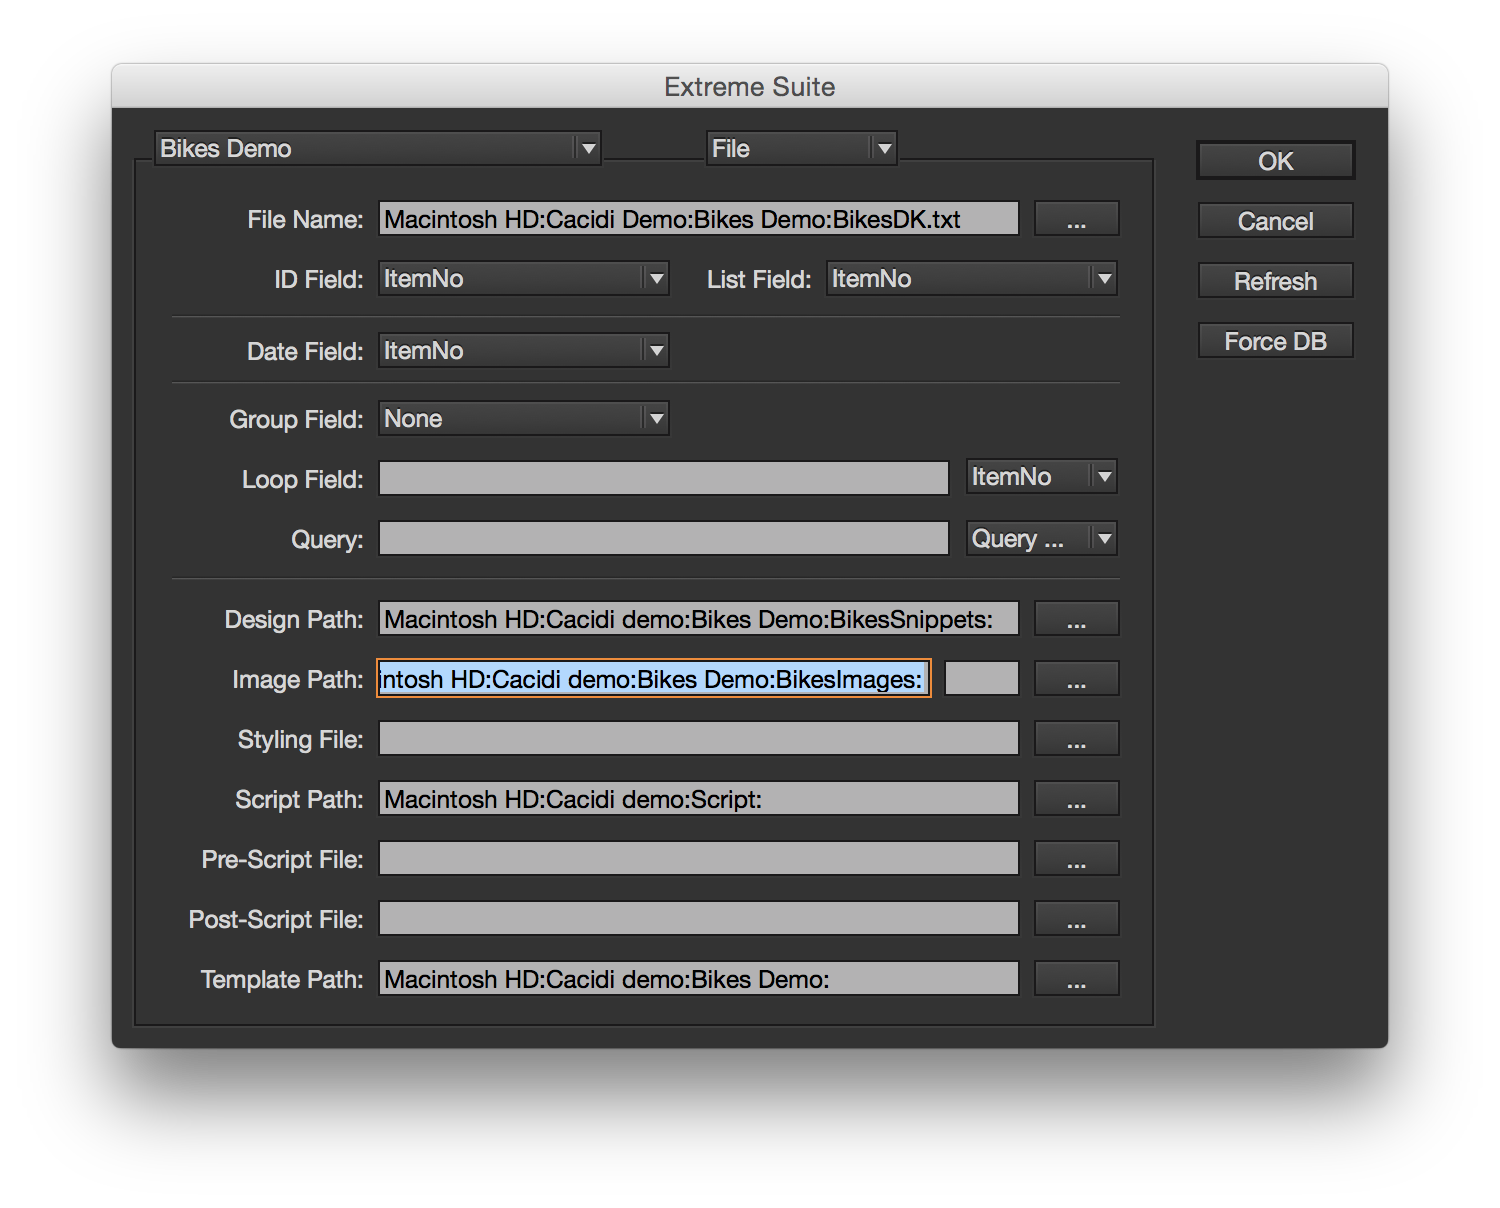 Setting up the project
In this tutorial we will use the “Bikes demo”, which is a part of a standard installation. The “Bikes demo”, has the name part, but not the file path to the image in the data source. As you can see in the project dialog box, the image path is pointing to the location of the image folder. If you data source contains the full name and file path you will not need to setup the “Image Path” information. The small text field right next to the “Image Path” is a field were you can enter a fixed extension for the images you are using.
A complete address to an image will be constructed like this
contentsOfTheImagePath + [theMergeMarker] + the file extensionof e.g.
Macintosh HD:myImages:myProduction:theDynamicdata.jpg
You are able to use as many merge markers as you wish, and the full image address can by constructed using many fields and locked text like this example:
[harddrive]:my images:[division]:[department]:[theImageName].[extension]
The file extension information
The file extensions information is the first choice Extreme/LiveMerge are using when trying to place the file, if the image is not available with the specific extension the software will try a number of other extensions like jpg, psd, eps, pdf, tif, tiff and png.
Set the merge maker on a image frame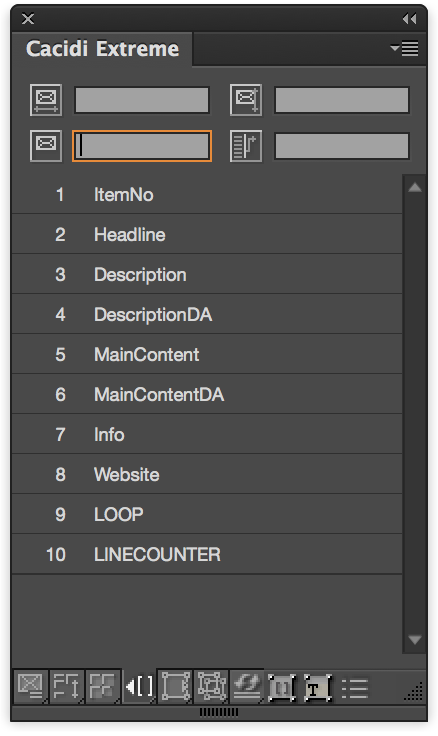
The merge marker can by set to the frame using two different methods 1) by using the “Text Link Panel” and clicking the field name or 2) in the “Frame Panel Settings” to enter the merge markers by hand. If you just have one merge marker to a frame, the easiest way is to use the “Text Link Panel”.
Create an image frame, and import an image to the frame, to play with.
Just select the frame using the black arrow, click on the merge marker in the list, and the merge marker is set for that frame. A box adornment is shown on the frame, so you can see the information is applied.
 If you have multiple merge markers to a frame, you can construct the full or part of the file name and path using the “Frame Panel Settings”, navigate to the text field shown with a camera icon, and inset all the merge marker, simply by entering them in the field. Remember to use the square bracket around the merge name and remember that spellings is critical.
Scaling the image
The image will be fitted to the frame in either first scale or second scale. These terms are also known as “Scale within the frame proportionally” and “Fill the frame with the image proportionally”. When using the first scale option to image is not cropped and the full image is visible, when using the second scale the image will be cropped to make sure the frame is fully filled with the image. If you have an image in the frame, we will be able to see the first scale / second scale in action.
Alignment of the image
The alignment is controlled in the 9-dot matrix, and you set the starting for the scaling, the default is center/center which means that the scaling and the cropping/air will be equal on both sides on the frame.
Adjust the frame
When the scaling is done you can as an option set the frame to be fitted to the image, so the size will be adjusted to be the same size as the image itself.
Delete frame or not
The Delete Empty Box will delete the empty frame, if the placement of the image fails, for some it is nice to have the frame deleted. But it depends in you flow. If you have a flow where the images you will use is available later on and you would like to run an update for automated insert of the missing images, you will need to keep the image frames. If you delete the boxes Extreme/LiveMerge can’t update to document when the images is available.
Scale and align by numbers
You have a possibility to scale and align using a bracket after the file name, it can by used e.g. if you have some icons you know should be scales in 43%, and align 0 pt from the top. The bracket info has these informations
(Scaling,H_offset,V_offset,Rotation,KeepPlaceholder)
Where Scaling is the image scaling in percent (100 means no scaling), H_offset is the Horizontal offset by the top left corner of the image frame, V_offset is the Vertical offset, Rotation is the clockwise rotation in degrees and KeepPlaceholder should be either kfalse or ktrue where kfalse will delete any placeholder image in the frame and ktrue will keep the placeholder image if the selected image from the Data Source is empty or doesn’t exist.
If you have applied first or second scaling to the image frame using the options mentioned below, you can keep this scaling by entering 0 as Scaling.
The information should be entered after merge field or image path, like this:
[Image](77,10,20,45,kfalse)