
In all the previous lessons, you may have created an amount of automated graphic productions. Common for all of them is the designer driven workflow in the creator process. In other words, you as a designer have been in charge of exactly where all the boxes should be postioned, and the database content has simply filled in it’s content row by row in the boxes you created in advance.
In a scenario where the designer is not completely in charge of the document layout, but is dependent on the amount of data to fill in and optimise for layout space, using database driven automation, or AutoCalculation as we like to call it, can be the better choice.
This lesson takes you through the use of Extreme AutoCalc in a scenario where you are going to create the same real estate ad you produced in a designer driven way in this lesson . This time you will setup the automation of the document in a database driven way, though.
The Cacidi Extreme AutoCalc feature
The Extreme AutoCalc feature is quite similar to the other Extreme features, only the AutoCalc method offers a few more options for input fields and settings.
Important are the ”Heigth”, ”Width”, ”Command” and ”Item” fields. Equally important are the various options for breaking and non breaking calculation styles that can be preset from the pop-up menu when using the the Cacidi Extreme AutoCalc feature.
Automation using the Extreme AutoCalc features
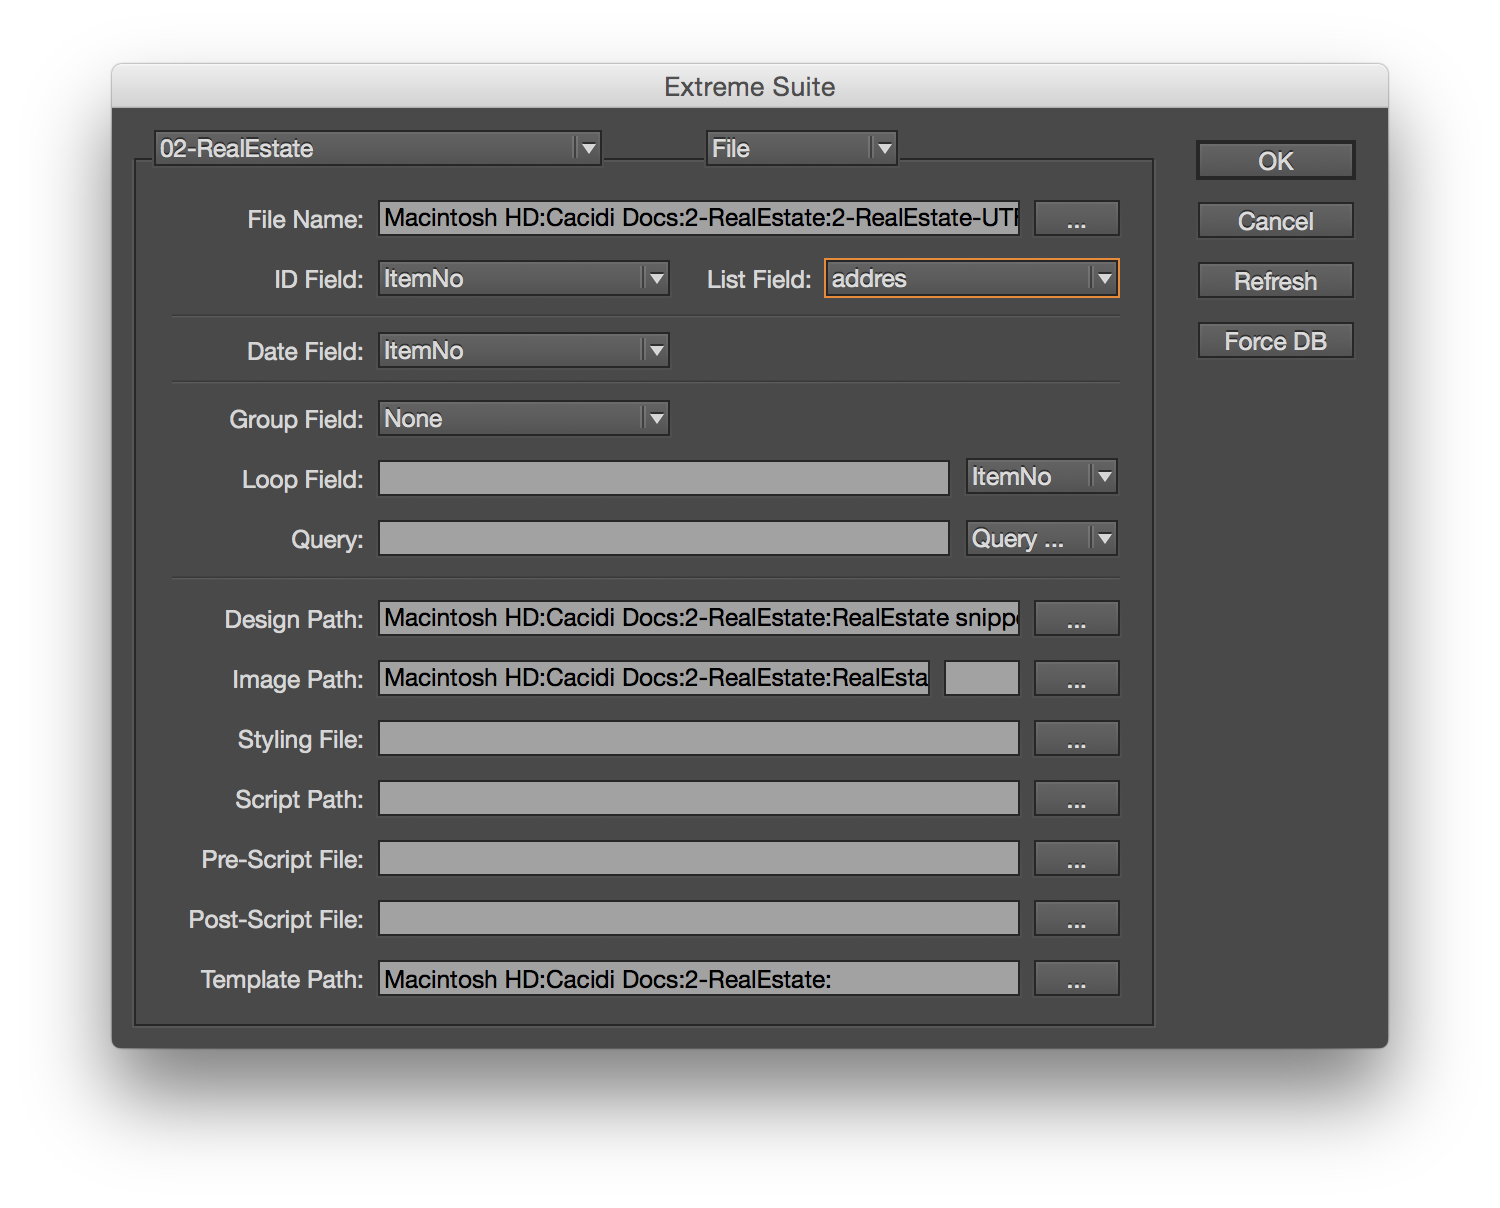
Select the ”02-Real Estate” project with the ”Cacidi Extreme” palettes fly-out menu. If you are missing the tutorial files, you can download them from here and read about setting up the projects here.
 Then open the ”Real Estate” InDesign template from the pop-up menu in the Cacidi Extreme palette.
Creating an AutoCalc style
Click the second button, in the bottom of the Cacidi Extreme palette.
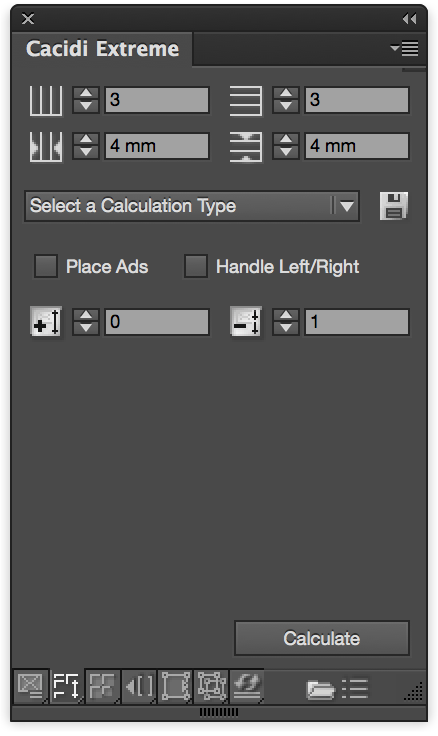 From the pop-up menu “Select a Calculation Type, select the ”Non-Breaking Vertical” style. This will allow you to create an automatic calculation of the document based on boxes created vertically top to bottom, left to right. By choosing the non-breaking style, you instruct Cacidi Extreme to make sure that no boxes are broken into two columns, if for instance a single item design will not fit into a remaining space at the bottom of the layout.
Setup the grid for this production in the top of the “Calculation panel” Number of columns=6, Number of Rows=4 and the gutterboth horisontal and vertical are set to 4 mm.
 Now, navigate to the “Link Panel” by clicking the fourth button in the bottom part of the Cacidi Extreme panel. In the input fields in the Cacidi Extreme link tool section input information like this: : [height], : [width],: [command], : [itemdesign]. This is done by selecting the input names in the scroll list and then clicking the symbols left of the fields.
By inputting this information, you instruct Cacidi Extreme to ”look” for fields in the datafile with exactly these names and calculate the design based on what is in the corresponding records to the fields.
Adding The Place Ads feature
Now, again click the AutoCalc feature button, and put a checkmark in the ”Place Ads” box in the Extreme AutoCalc palette. By checking this box, you are now able to instruct Cacidi Extreme to fill in pre-defined ad graphics in those tiles that are perhaps remaining empty in the layout after all the automated estate ad boxes have been created in the document. Click the folder icon on the bottom of the panel and choose the “EDC-1” file in the folder. By using the – (dash) in the file name the AutoCalc function can choose by different images for ads, a -1 for a 1 tile image in the height, -2 for a 2 tile image and so on.
Understanding the datafile
Before you run the AutoCalc job, it is a good idea to have a general understanding of the datafile used for the automatic production.
By using a text editor or an application like Microsoft Excel, Apple Numbers or OpenOffice, open up the “02-RealEstate.csv” file.
 You will se a number of fields and records containing data.
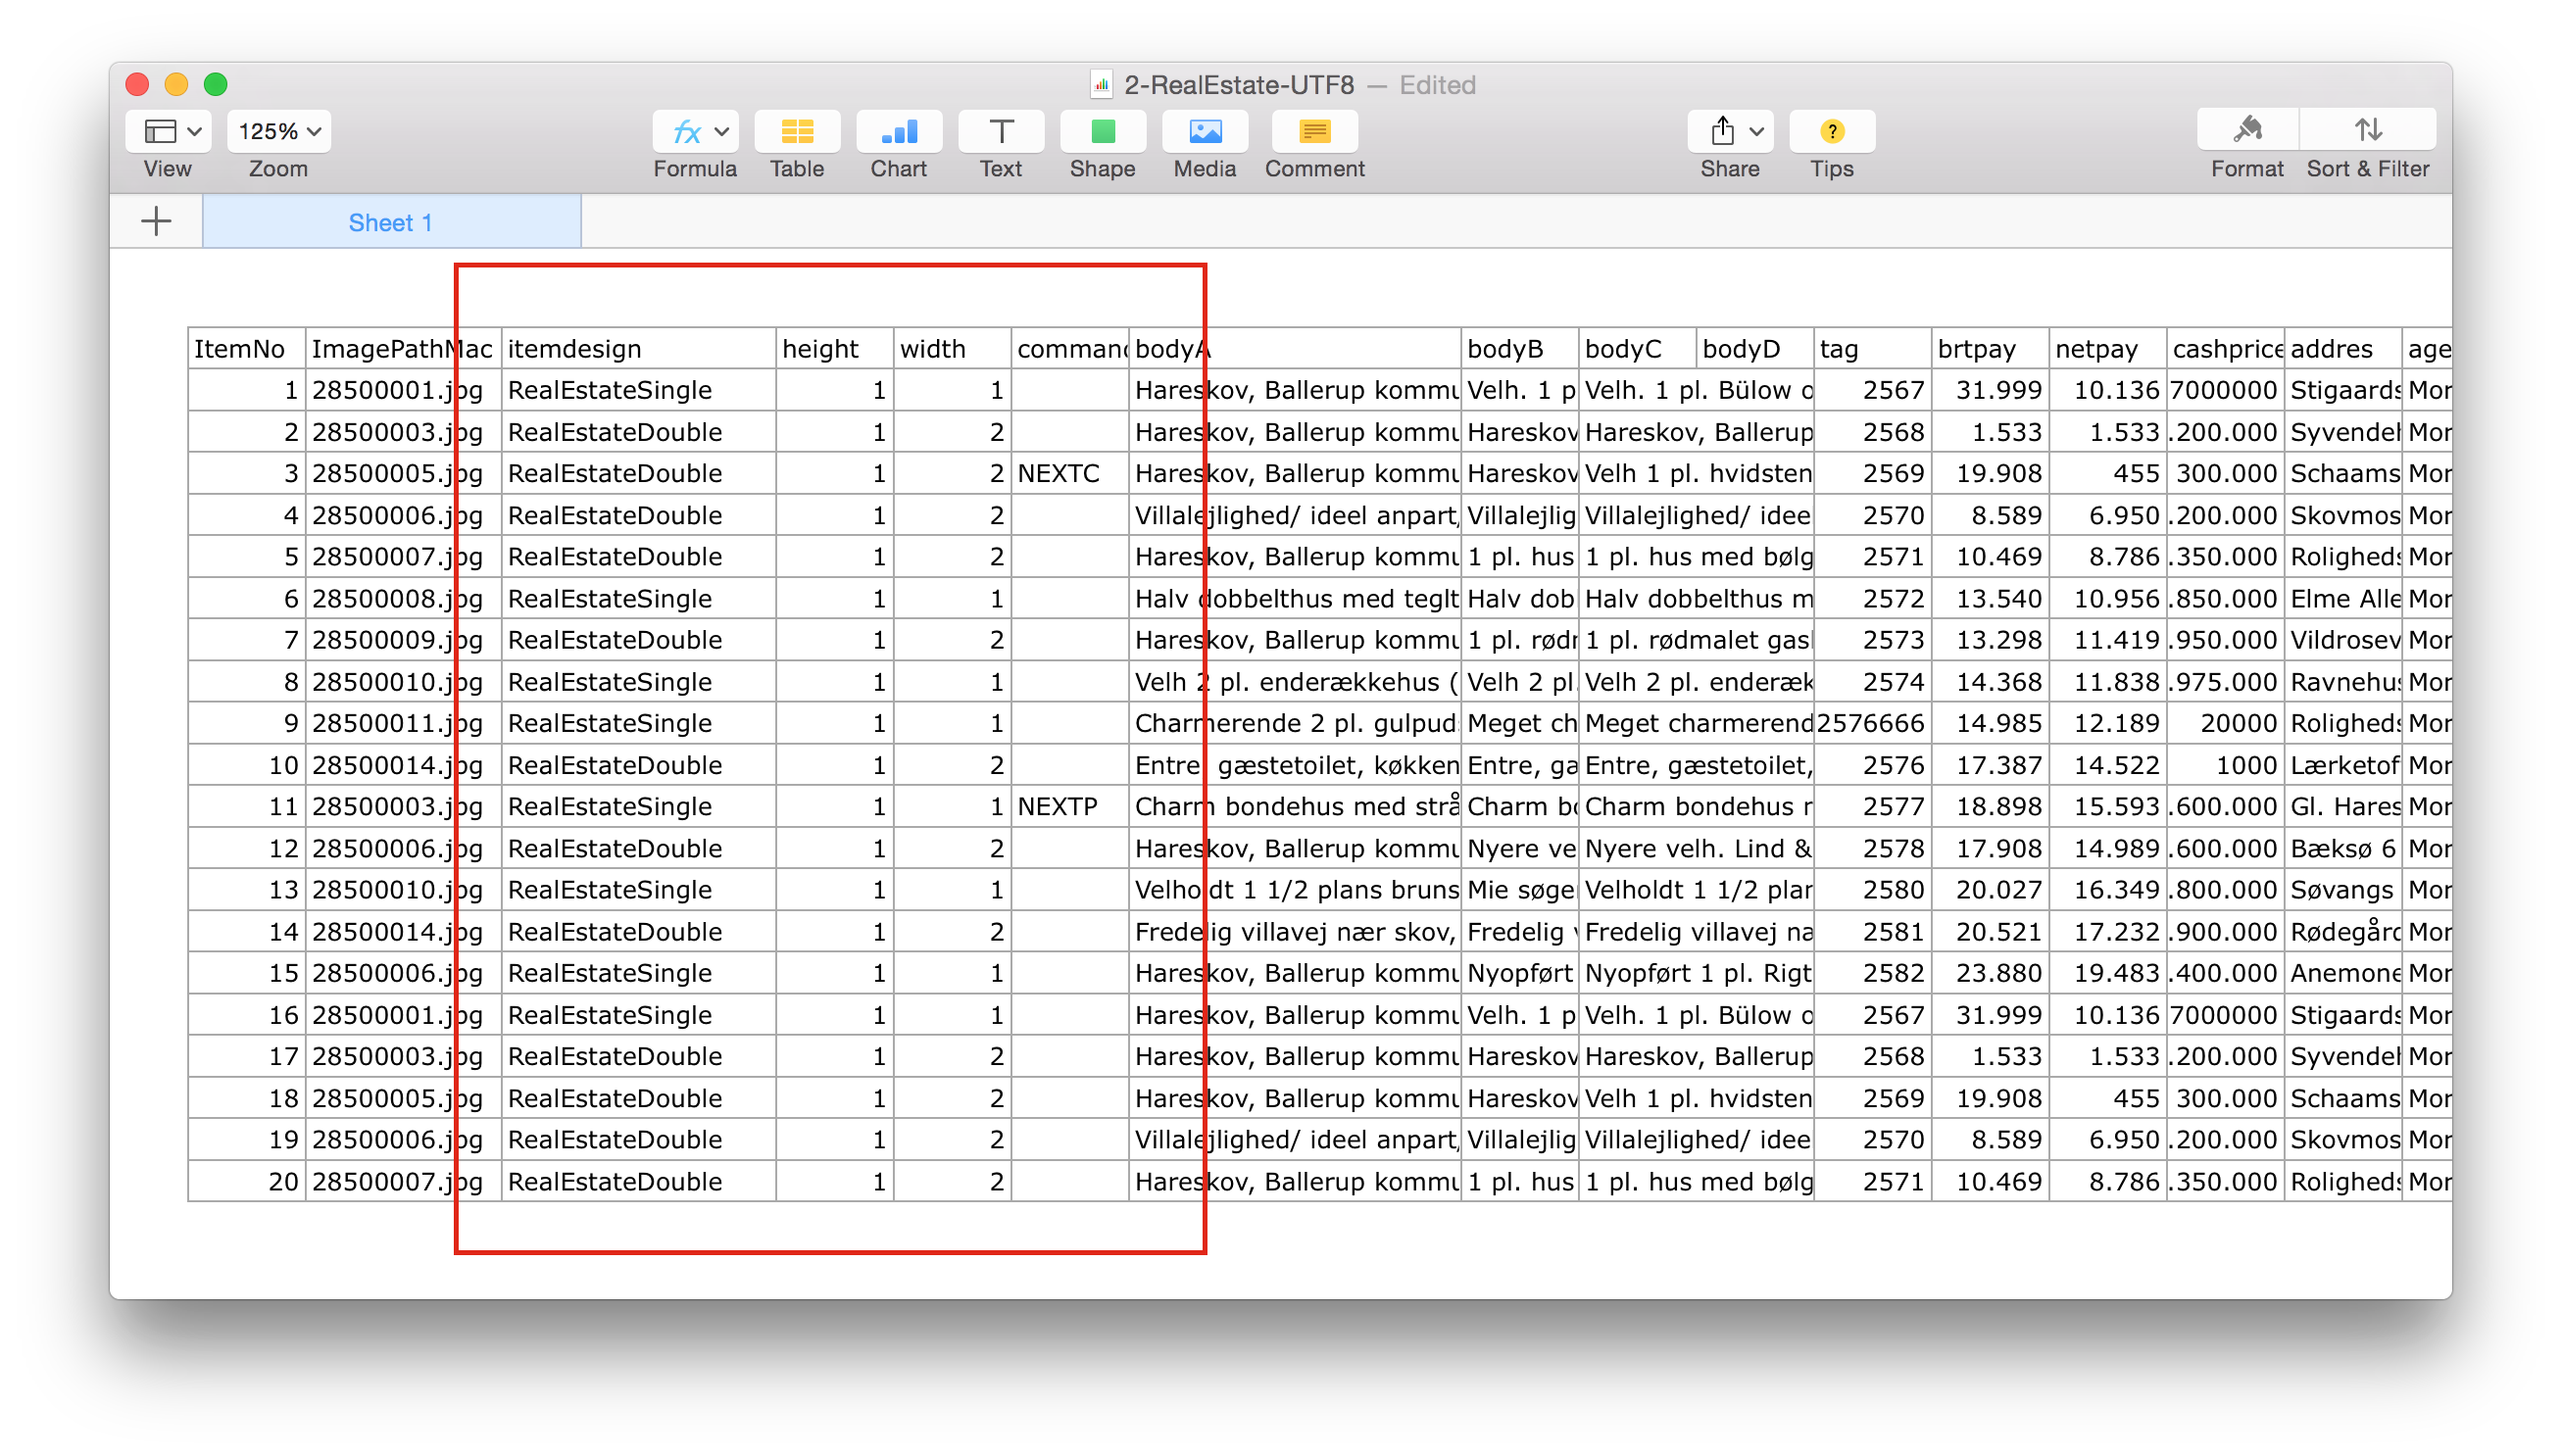
For easier understanding what happens in the AutoCalc production you are about to run, in the datafile, scroll to the fields at the very top named “height”, “width”, “command” and “itemdesign”.
In the data rows below these fields, note that information is applied to make Extreme AutoCalc able to calculate the layout disposition in InDesign.
In the “itemdesign” field, some of the records have “RealEstateSingle” entered, others have “RealEstateDouble” entered.
This simply means that Cacidi Extreme in AutoCalc mode will understand which of the two Cacidi Extreme Item Designs to use when building a box for a given record.
The “height” and “width” fields are set to 1 by 1, or 1 by 2. Again, this simply means that AutoCalc will understand exactly how much space in the InDesign layout (1 by 1 is one tile, and 1 by 2 is two tiles) to allocate the box when building it.
The “command” field is in this automation not in use and is therefore left empty in the datafile. Basically, the command field is used to force a given record in the datafile to build in new column, a new page or even starting on the left side of a spread in InDesign. See the Extreme manual in PDF format, located within your Cacidi Docs folder for further documentation on this.
Now that you are aware of the data in the file, go back to the InDesign application.
Running the AutoCalc production
With the “Real Estate” InDesign document open, in the Cacidi Extreme palette, select the AutoCalc style “MyCalcStyle”.
Now, click the “Calculate” button in the Extreme AutoCalc palette.
The document is now producing in AutoCalc mode, which means that first of all is the Cacidi Extreme software calculating how many boxes to build, depending on how many records plus their design and size description comes in from the datafile. After the calculation is done all boxes are placed in the layout and finally the remaining tiles are filled in with place ads.
In this specific production all the house sale records take up totally 23 tiles, and since the grid setting in the document present a total of 24 tiles, only one tile is left to fill in with a place ad.